Skin Care
A Complete Facial Gua Sha Routine
A step-by-step full-face gua sha sequence from forehead to neck, designed for daily practice in under ten minutes.
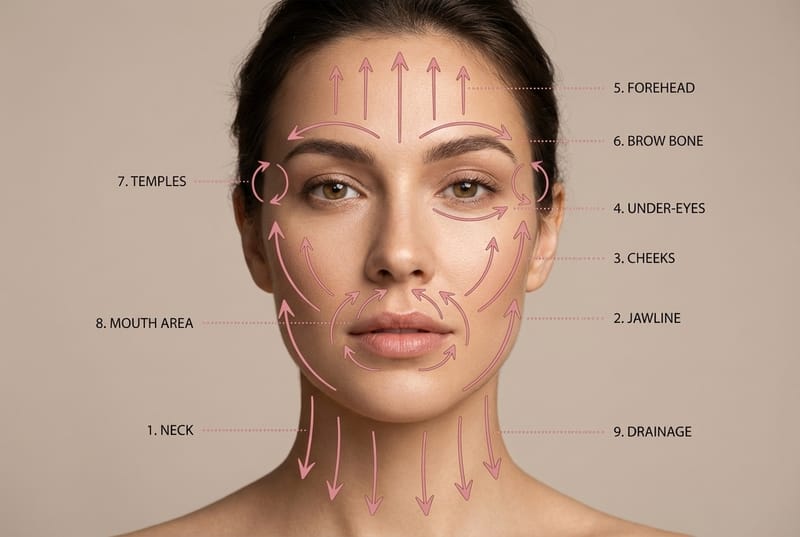
Now that you understand the tools, preparation, and core strokes, it is time to put everything together into a complete routine. This sequence covers the entire face and neck in a logical order, following the lymphatic drainage pathways for maximum effectiveness. The full routine takes about eight to ten minutes once you are comfortable with the strokes. With practice, the movements become fluid and intuitive, and the routine becomes something you look forward to rather than a task on your list.
Before You Begin
Cleanse your face thoroughly and apply your facial oil. Open your lymphatic pathways by stroking gently down each side of the neck five times with your fingertips. Take three deep breaths and let your shoulders drop away from your ears.
Step 1: The Neck
- Clear the drainage pathways first. Starting just below the ear, use the flat edge of the tool to sweep gently downward along the side of the neck to the collarbone. Repeat five times on each side. This ensures the pathways are open before you begin moving fluid from the face.
Step 2: The Jawline
- Define and release. Place the notched edge of the tool at the center of the chin, fitting it around the jawbone. Glide along the jaw toward the earlobe using moderate pressure. Repeat five times on each side. After each set, perform one neck drain stroke to clear the fluid you have moved.
Step 3: The Cheeks
- Lift and depuff. Place the curved edge of the tool beside the nose. Sweep outward across the cheek toward the ear in one smooth motion. Work in three horizontal lines: beside the nose to the ear, beside the nostril to the upper ear, and along the cheekbone from nose to temple. Repeat each line three to five times on each side.
Step 4: Under the Eyes
- Treat with extra care. The under-eye area has the thinnest, most delicate skin on the face. Use the smaller, curved end of the tool with very light pressure. Starting at the inner corner of the eye, glide gently outward toward the temple. Repeat three times on each side. Never press hard enough to move the eyeball or compress the orbital bone.
Step 5: The Forehead
- Smooth and release tension. Place the tool at the center of the forehead between the eyebrows. Sweep outward toward the temple. Work in horizontal lines from the brow to the hairline, covering the entire forehead. Repeat each line three times on each side. For the area between the eyebrows, use the smaller edge with gentle upward strokes to address the muscles that create the eleven lines.
Step 6: The Brow Bone
- Relieve tension headaches and brow heaviness. Place the curved edge of the tool at the inner end of the eyebrow. Glide outward along the brow bone to the temple with gentle pressure. At the temple, pause and hold for five seconds with a gentle press before releasing. Repeat three times on each side.
Step 7: The Temples
- Release one of the face's biggest tension zones. Place the flat side of the tool against the temple and hold with gentle, steady pressure for ten seconds. Then sweep downward from the temple, in front of the ear, and down the neck to the collarbone. This clears the fluid that has accumulated at the temple from the forehead and eye area strokes.
Step 8: The Mouth Area
- Address the lines and tension around the lips. Place the tool at the center of the upper lip and sweep outward toward the corner of the mouth and then up toward the cheekbone. Repeat three times on each side. For the chin, sweep from the center outward along the jawline.
Step 9: Final Neck Drainage
- Finish by clearing everything. Return to the neck and repeat the downward drainage strokes five times on each side. This final flush moves all the fluid and metabolic waste you have mobilized throughout the routine toward the lymph nodes at the collarbone where it can be processed.
After Your Routine
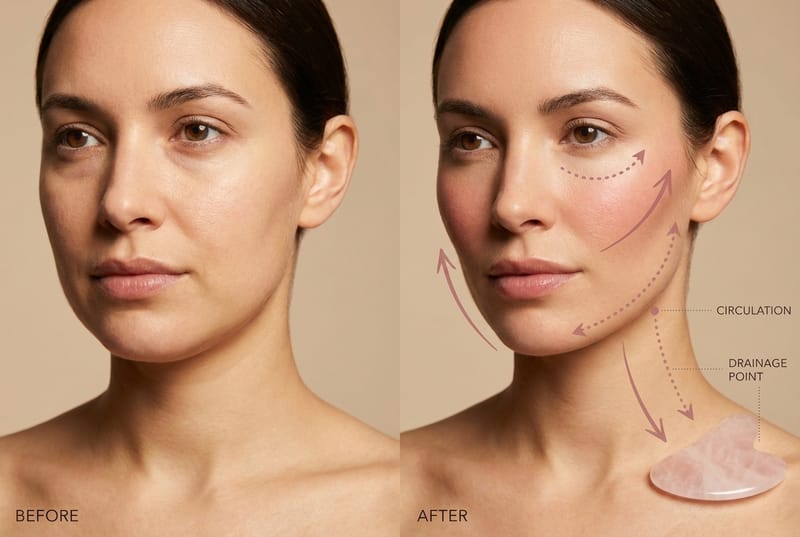
Pat any remaining oil into your skin. Follow with your regular serum and moisturizer. Your skin will likely look flushed and glowing immediately after, which is a sign of healthy circulation. This flush typically subsides within ten to fifteen minutes, leaving behind a clearer, more sculpted appearance.
If you practice gua sha in the morning, follow with sunscreen as usual. If you practice in the evening, your nighttime products will absorb more effectively because the increased circulation enhances ingredient delivery.
Pairing this gua sha routine with your Yasmine face yoga practice creates a comprehensive facial wellness ritual. Many practitioners do their face yoga first to activate and tone the muscles, then follow with gua sha to address circulation, drainage, and surface tension. Together, the two practices take about fifteen to twenty minutes and deliver results that compound over time.